From time to time, more often than you will, you will get small spots on your images, especially in flat areas of colour such as a sky or a plain wall. They will be much more visible on pictures taken with a small aperture (F8 and above).
They will certainly ruin your picture and even more on a huge and expensive print.

Cet article est en anglais car je l’ai rédigé pour apparaitre dans la newsletter de mon club photo « Viewfinders« .
Where are they coming from ?
The origin of these spots is dust spots or small hairs located on the lens or, worse, on the image sensor. They’re getting to your sensor or the back part of your lens mainly when putting another lens on your camera. That will therefore affect all the cameras with a removable lens.
How can I avoid it ?
Avoid changing the lens in a dusty environment, have clean gears, limit as much as possible the time needed to change the lens, have at all time a cap on the camera lens hole and on your lenses. Most cameras are doing their best to keep the sensor clean (anti-static coating, vibrations when powering on, …) but unfortunately it’s not sufficient.
Whatever you do you will definitely get dust spots!
The remaining part of this article will explain how you can remove them from your gear (preventive action) or from your pictures (curative action).
How can I remove it from a lens ?
It’s the easy part! A dust blower, a brush and a clean micro-fibre cloth are what you need to get rid of the dust spots in a snap.
Pay attention to use dedicated stuff that you can find easily for a few bucks in specialized shop or e-commerce web sites. You don’t want to apply a thin coat of oil on your lens because you’re using a brush bought at the painting store …

The dust blower is a rocket-shaped device that gently blows air that will remove most of the particles. Avoid the canned air device that can produce high-pressure flow of air that can eventually damage parts of your gear.
How can I remove it from an image sensor ?
WARNING : If you are at all uncomfortable about your ability to properly and carefully remove dust from your camera sensor, don’t attempt it; have an authorized service technician take on the job. You can irreversibly damage your camera by improperly attempting to clean it.
That’s the less easy part and has said in the Warning you can severely damage or even destroy your camera if you don’t do it properly.
Most specialized shop will propose a professional cleaning service for around 35-50€.
So let’s continue for the non-faint-hearted !
Till this point having a DSLR or a mirrorless camera doesn’t make a difference but when coming to clean the sensor the mirror of the DSLR will add some complexity and risks.
For a DSLR you must be sure that the battery is fully charged and you must activate the sensor cleaning function via the camera menu. You must also pay special attention to NEVER touch the mirror and his mechanism. These are extremely fragile parts and any contact will damage them.
After the cleaning, you can easily test if the dust sots are gone by taking a picture at F16 of a sheet of paper, refrigerator door, painted wall, … You just have to magnify the picture and check if the dust spots are gone. They remain in the same place so it’s quite easy to do this check.
Without contact with the image sensor
You have to take off the cap or the lens, for a DSLR activate the sensor cleaning function with a fully loaded battery, turn the camera with the lens hole facing the ground and with the air blower gently blows air on the sensor.
In some cases that will solve the problem, if not you have to use swabs to clean it … and therefore you have to touch the sensor surface.
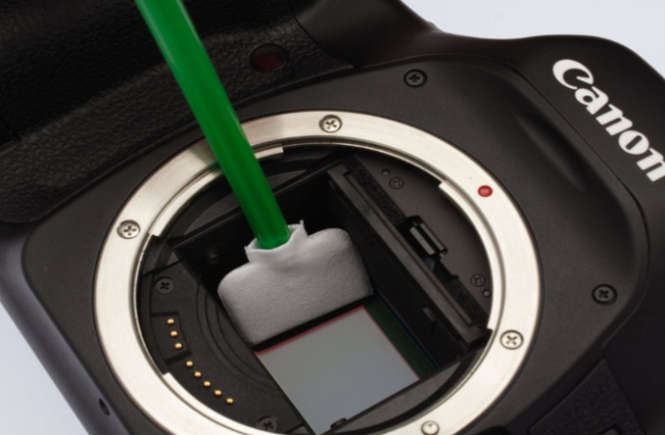
With contact with the image sensor
You need to buy so-called Swab of the right size (depending of the sensor size).
You MUST read the provided notice before starting.
You first put some drops of the provided cleaning liquid on the swab. Some of them are provided within a sealed pocket and are already impregnated with the cleaning liquid.
You press very gently the swab on one end of the sensor and move it to the other end. You tilt it and do it in the other direction.
NEVER do it more than once with the same the swab. You just use it once and then throw it away.
In most cases the dust, or greasy drop, will be removed. If not do it a second time with a new swab.

How can I remove dust spots from my pictures ?
Dust spots can be removed by using the “Clone Tool” which replaces information for one part of a picture with information from another part. The process is easy but cumbersome and time consuming.
You need to do it dust spot by dust spot while adapting the size and the feather of the brush to get a good result. Choosing the “Heal” option will help to make the correction invisible.
Adobe Lightroom has a very nice feature for making the dust spots more visible during the removal process. When the “Spot Healing Tool” is active you just have check the “Visualize Spots” checkbox and to play with the slider to make the spots much more visible.

To take away …
Whatever you do you will have to deal with this plague.
You can remove it from your pictures in post-processing but the only reasonable way is to keep your gear (lenses and image sensors) clean.
I’m doing it myself for years without any trouble but again there’s always a risk that you will damage or destroy your stuff if something goes wrong.